Setting up KVM shared directory in ubuntu 14.04

In KVM virtualization you can share a filesystem directory from the host to the guest via 9p-virtio.

Since it’s not trivial to get working I’m going to share the few steps that you need to take.

  1. In virt-manager open the virtual machine that you want to access a directory.
    step1 VM
  2. Click “Add hardware”
    1. Choose Filesystem, mode=Squash
      Type the source path, the browse button will not get you anywhere you want to go.
      Put some name in the Target path – it’s used to identify the share on the guest machine.
      step2 add hardware
  3. If your guest machine is running while you are adding it you will have to shut down the guest before it works. (not restart! – the VM process has to be closed)
  4. You will likely hit the Read-only permissions problem (look at trouble shooting below)
  5. In your guest: test that it works (as root):
     mount -t 9p -o trans=virtio,version=9p2000.L /commonshare /mnt/test 
    1. In the unlikely event that you have character set problems, look in trouble shooting below.
    2. unmount it again after verifying:
      umount /mnt/test
  6. Making it permanent in /etc/fstab
     /commonshare /mnt/commonshare 9p trans=virtio,version=9p2000.L,access=any 0 0 

I have one problem (for my setup) that I’ve not solved yet: mounting the files with a given users file permissions UID/GID (hopefully to be solved soon, I’ve asked on the 9p-users list) such that my guest webserver can get write permissions without changing the permissions on the host. If you have a solution, please post it in the comments.

Trouble shooting:

  • Permisions: I had read-only access at first, make sure that the user running the qemu process (KVM, look in htop, “libvirt-qemu” i my case) has RW access to the files shared – e.g. by adding the user to the group who owns the files (/etc/group). Then shut down your VM and start it again (not restart – a restart will not give the qemu process the new group membership ).
  • Character set: I had a problem with non-ascii characters looked wrong, e.g. “bøger” looked like “b??ger”. That was because my Guest machine was not properly configured  with the locale (which I had noticed but ignored during dist-upgrade “Can’t set locale; make sure $LC_* and $LANG are correct!”). I solved it by running  “dpkg-reconfigure locales” and selecting the right locale – don’t remember exactly what I selected.
  • Ubuntu 13.10 or below: you will likely hit AppArmor problems: https://bugs.launchpad.net/ubuntu/+source/libvirt/+bug/943680
  • Which users should have access on guest VM: see slide 26 on http://www.slideshare.net/ericvh/9p-overview

Sources:

For references my setup consists of:

  • host: ubuntu 14.04 with KVM and libvirt
  • guest: debian 7.8
  • I control it with virt-manager which I run from my kubuntu desktop.

How to check if a table exist in SQLite

You should use the sqlite_master table to look up if a table exists.

In php you would to the following.

$db = new SQLite3('mydb.sqlite3')
$tableCheck =$db->query(
  "SELECT name FROM sqlite_master WHERE name='myTableName'");
if ($tableCheck->fetchArray() === false){
  doMyInitializeThing($db);
}

Color your terminal return codes

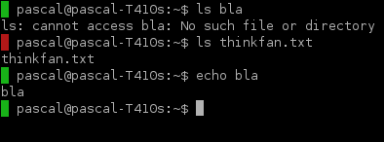
Any program you run outputs a return-code when it stops to tell the system whether it was successfull (including ‘terminal commands’ like ls, which is actually also a program). I use the terminal a lot so I appreciate things that make it even better – like for example coloring the terminal return codes that can be seen in the screenshot below. 

Image

The color that prefixes the input field reflects the return code of the last command executed. 

It was inspired by a comment this blog about coloring the terminal shell.
You get it by adding the following to your .bashrc (afterwards you have to restart your terminal) 

# Success / failure indications for return code of job.
OLDPS1=$PS1
PASS=' '
FAIL=' '
SEGV='X'
CLEAR='\e[0m'
RED="${CLEAR}\[\e[41m\]"
GREEN="${CLEAR}\[\e[42m\]"
WHITE="\[\e[0m\]"

PS1="\`RC=\$?; if [ \$RC = 0 ]; then echo ${GREEN}${PASS}${WHITE}; elif [ \$RC = 139 ]; then echo ${RED}${SEGV}${WHITE}; else echo ${RED}${FAIL}${WHITE}; fi\` $OLDPS1"

Integrate Deja-dup into KDE Dolphin

Deja-dup is an excellent backup program – however it does not have integration with KDEs filemanager dolphin. Integration meaning that you can right click in a folder and select “restore missing files” or right click a file and select ‘Revert to previous version’

Adding “Restore missing files” to directory

Create a file the following in “~/.kde/share/kde4/services/ServiceMenus/dejadup_restore_missing.desktop”

[Desktop Entry]
Type=Service
ServiceTypes=KonqPopupMenu/Plugin
MimeType=inode/directory
Actions=DejaDupRestoreMissingFiles
[Desktop Action DejaDupRestoreMissingFiles]
Name=Restore missing files in folder
Name[da]=Genskab manglende filer i mappen
Icon=edit-find
Exec=deja-dup --restore-missing "%U"

Adding “Revert to previous version”

Create a file the following in “~/.kde/share/kde4/services/ServiceMenus/dejadup_revert.desktop”

[Desktop Entry]
Type=Service
ServiceTypes=KonqPopupMenu/Plugin
MimeType=application/octet-stream
Actions=DejaDupRestoreFile
[Desktop Action DejaDupRestoreFile]
Name=Revert to previous version...
Name[da]=Tilbagevend til tidligere version...
Exec=deja-dup --restore "%U"

The above integrates deja-dup just for your user. Adding it to the following path will make it available to all users of your computer.

/usr/share/kde4/services/ServiceMenus

More documentation of the KDE servicemenus can be found here: http://techbase.kde.org/Development/Tutorials/Creating_Konqueror_Service_Menus

4G Telia USB-modem in denmark works out-of-the-box with Kubuntu linux 11.10

I just want to let you know that the Telia 4G usb modem (Huawei E392) works out of the box with Kubuntu Linux 11.10.

The guy in the store said they didn’t support linux, but I was allowed to try it out and when I threw it in I had to wait 10-15 seconds before network-manager had discovered it (due to Huawei modems think they have to emulate a CD in order to auto-install in Window, WTF! ).
After that I chose “Manage connections” in network-manager and added a new mobile broadband connection. It suggested the modem (yipee) and I chose country and provide. Within 2 seconds of clicking on the new connection I was online with this fast new modem 🙂

Very nice. So the support on Kubuntu linux 11.01 is good and I it should be the same on ubuntu since it the same base system.
BTW. I use KDE SC 4.8 (standard in 11.10 is 4.7. But now less than a month from official Kubuntu 12.04 release that uses KDE 4.8). I have no idea if it inflicts on anything with the network-manager plasma widget being developed a lot lately.

PDF stationery with the PDFCreator watermark option

I just wanted to let you know that PDFCreator (an open source pdf printer for windows) can merge your stationary PDF with whatever you are PDF-printing. The option is called watermarking, but it just merges the pages. Thus if you have a text document with “test” and you print it to a PDF with PDFCreator that is configured with your company stationary logo paper you will get a PDF with your logo paper and the text “test”.
It can be configured through Options when you print to a pdf. I created new profile called “company letter paper” and I enabled the run-after-pdf-script called “watermark”-something.

If you plan to deploy this to a bunch of machines I suggest reading this post although it is a bit old, it can still be used. I’ve used 1.0.2 for deploying, it works quite well.

Changing the name of ubuntu linux network interface.

As you attach network interfaces to Linux it will give it names.
The first network interface that is connected will usually be called eth0 if is a wired network interface.
If you have changed you network interface some times, your standard interface can now be called eth5 or something like that. It doesn’t bother a regular user, but it might be annoying from an administrators point of view that you don’t know the name of the interface.

Anyway, to change the name of the ethernet interface from eth5 to eth0 in ubuntu you just need to edit the file:
/etc/udev/rules.d/70-persistent-net.rules</li>

An example of the content of the file is:
SUBSYSTEM=="net", ACTION=="add", DRIVERS=="?*", ATTR{address}=="52:54:00:76:da:63", ATTR{type}=="1", KERNEL=="eth*", NAME="eth2"

Just change the NAME from eth2 to eth0 if that is what you want to do.